Installing An OS!
Step 1: Prerequisite Software Installation
- Raspberry Pi Imager - You'll use this to install the OS on the PiCar, and change some settings to get it connecting.
- Putty - This is used as a remote terminal for the Pi. Because the PiCar will be roaming without a display, this allows easier access and copy/paste.
-
- Installation should be pretty simple. Just click through the prompts, and use the default settings.
- After it gets installed, you can close out of the notepad opened.
Step 2: Let's Get Started! - Install the OS
Are you ready? Let's put some of those prereqs to work!
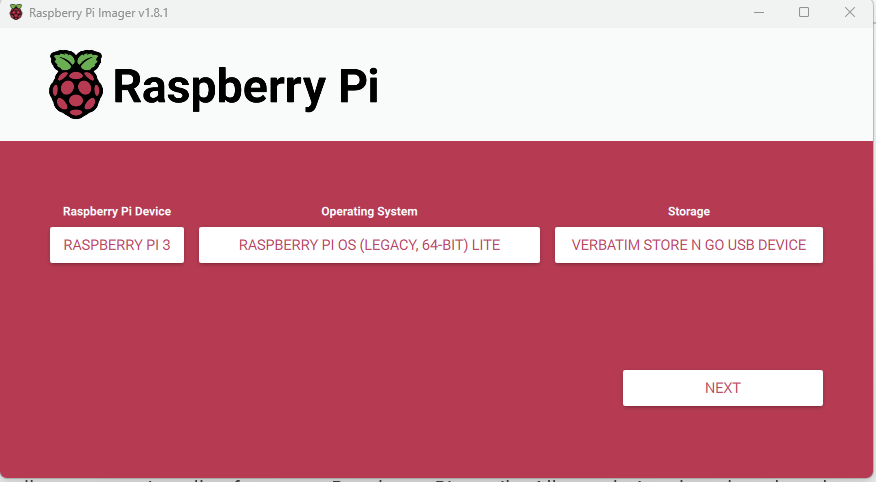
- Open Raspberry Pi Imager
- Insert a Micro SD Card to put in the Raspberry Pi for the OS.
- The Raspberry Pi Device is "Raspberry Pi 3
- The Operating System is "Raspberry Pi OS (Legacy 64-bit) Lite)"
- Make sure the storage device is the SD card for the PiCar.
- Press "Next", and then Select "Edit Settings"
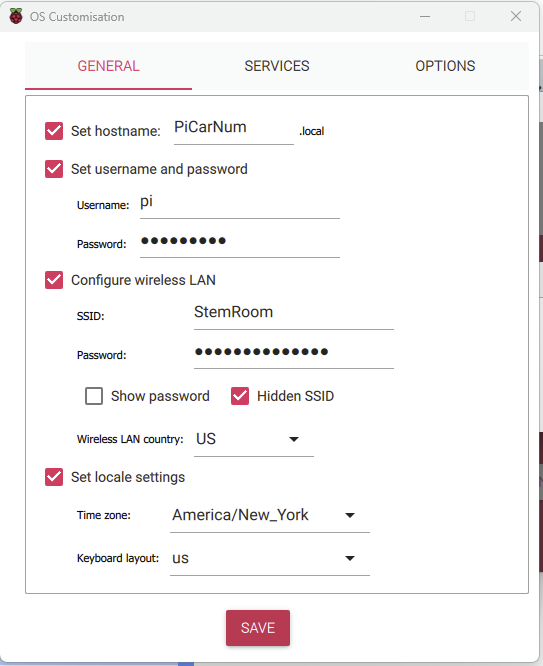
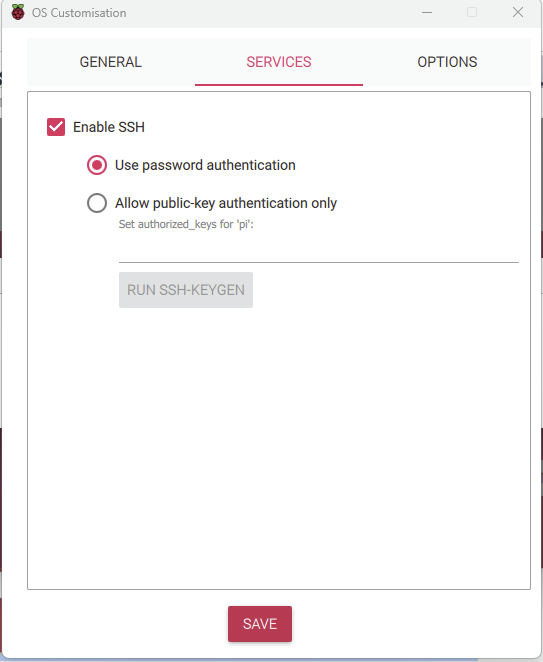
Copy these settings exactly:
Wifi Passwords In the future, to make these roam long range, the STEM "Travel Router" will be setup.
Replace the hostname "PiCarNum" with PiCar followed by the ID (1,2,3, or 4) Ex: "PiCar2"
For the account password, use STEMROOM6041, This password can only be used when connected to the secure STEM network, so it will not be a problem with security.
You can leave the options tab default.
Step 3: Revving Up The Pi!
- You can now remove the SD Card from the computer, and insert it to the Pi.
- Insert Batteries, connect Pi Power, and wait for it to start up. Wait 5 Minutes until the next step.
- No... I mean it. Set a 5 minute timer, and wait. This is a first startup for the Pi, and you'll have to give it some time to setup the filesystem, and connect to the network.
- Make sure the computer you're using is connect to the "StemRoom" network, or all the following steps will not work.
- Open Putty
- Under "Host Name (or IP address)" Enter the hostname you set before. Ex: PiCar2
- Select Open, and wait for it to connect
- On the off chance it does not connect, you can try setting the IP address of the car using an app like Fing to scan for the device.
- Under "Host Name (or IP address)" Enter the hostname you set before. Ex: PiCar2
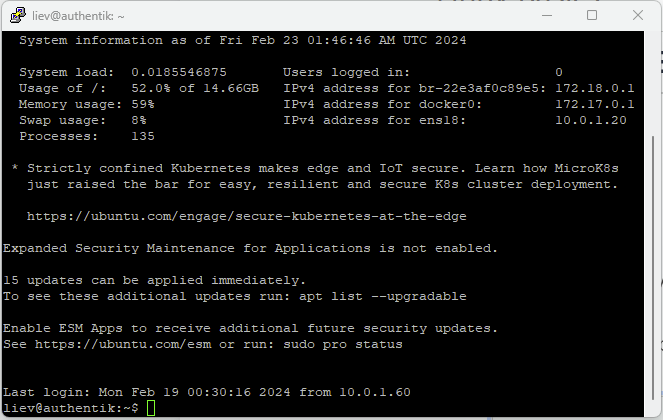
- You should now see a screen like this:

- Update the Pi - To update the pi, there are two separate, but similar commands you will need to enter. Remember to only type one in at a time, and let it run.
sudo apt update -ysudo apt upgrade -yYou may be asked for a password during this step. It won't show on the screen, but the input is still there. Type in "STEMROOM6041" and press enter
Now, just reboot the Pi, and the OS will be installed.
sudo reboot nowStep 4: The Nitty Gritty
Now, we'll setup some custom settings and software to get everything running smoothly.
Wi-Fi disaster recovery script.
- Open your home directory
cd ~ - Make the script using nano
nano wifirecover.sh - Paste in the following code by copying the text in the computer, and right clicking on anywhere in the putty window.
ping -c4 google.com > /dev/null if [ $? != 0 ] then echo "No network connection, restarting wlan0" /usr/sbin/ifconfig wlan0 down sleep 5 /usr/sbin/ifconfig wlan0 up fi- Use the keyboard combination Ctrl+X, Then press Y, Then press Enter, to exit
- Use the keyboard combination Ctrl+X, Then press Y, Then press Enter, to exit
- Now, we'll install cron. This lets you schedule tasks for certian times. In this case, it will check for internet connection intermittently.
sudo apt install cron - Crontab uses a text file for configuration, so we'll open it now.
sudo crontab -e - Select Nano as the text editor
- Add this exact line to the end of the text file by copying in the computer, and right clicking on anywhere in the putty window.
1 * * * * /bin/sh /home/pi/checkfistats.sh >/dev/null 2>&1 - Use the keyboard combination Ctrl+X, Then press Y, Then press Enter, to exit
YIPPPEEEE!!!! Your Operating system is now installed, and ready to install the PiCar Code!!!


